
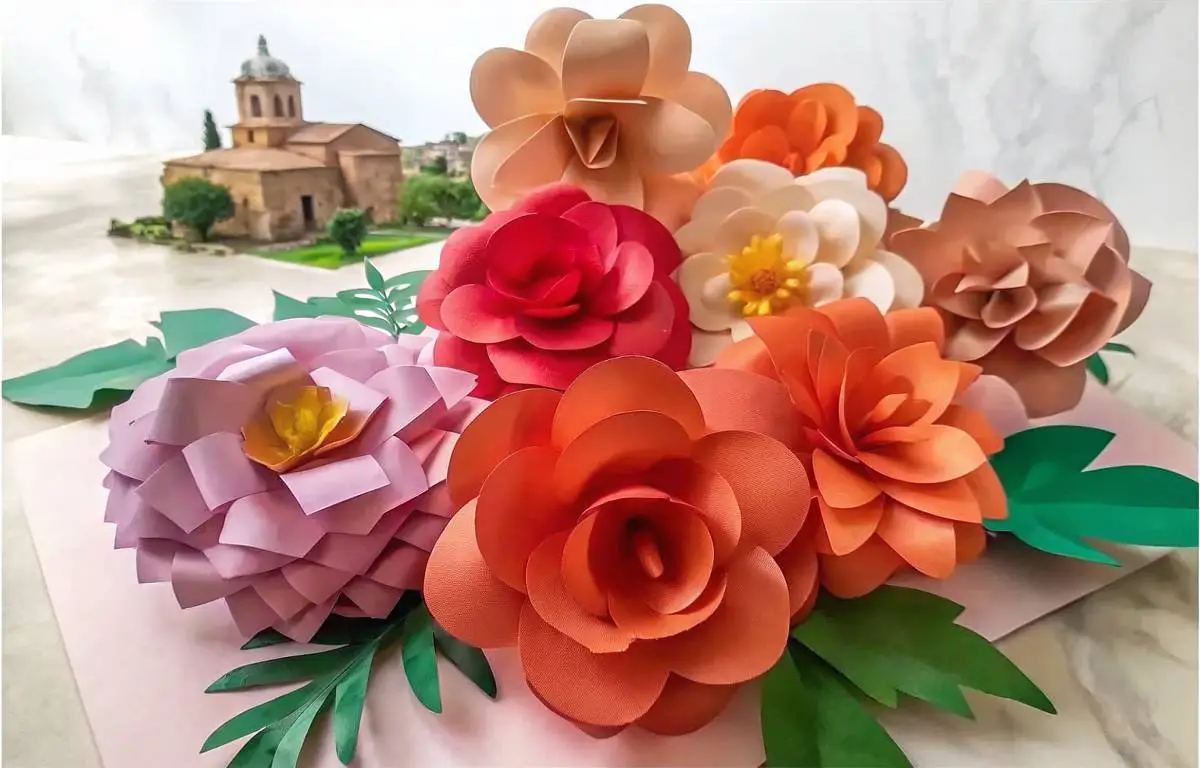
Paper flower folding is honestly kinda magic, and you don’t need a ton of fancy gear—just paper and some clever twists. I used to think I’d be stuck cutting perfect petals for hours, but then I tried this one folding trick, and boom, I was making flowers like I knew what I was doing. Once you get the basic folds and cuts down, it’s like, weirdly addictive. You can use ‘em to fancy up a party, whip up a gift that doesn’t look cheap, or just mess around on a lazy evening. My first one was a bit lumpy, but it still looked cool! Wanna turn boring paper into blooms? Let’s start folding.
Materials You’ll Need for All 4 Flowers:
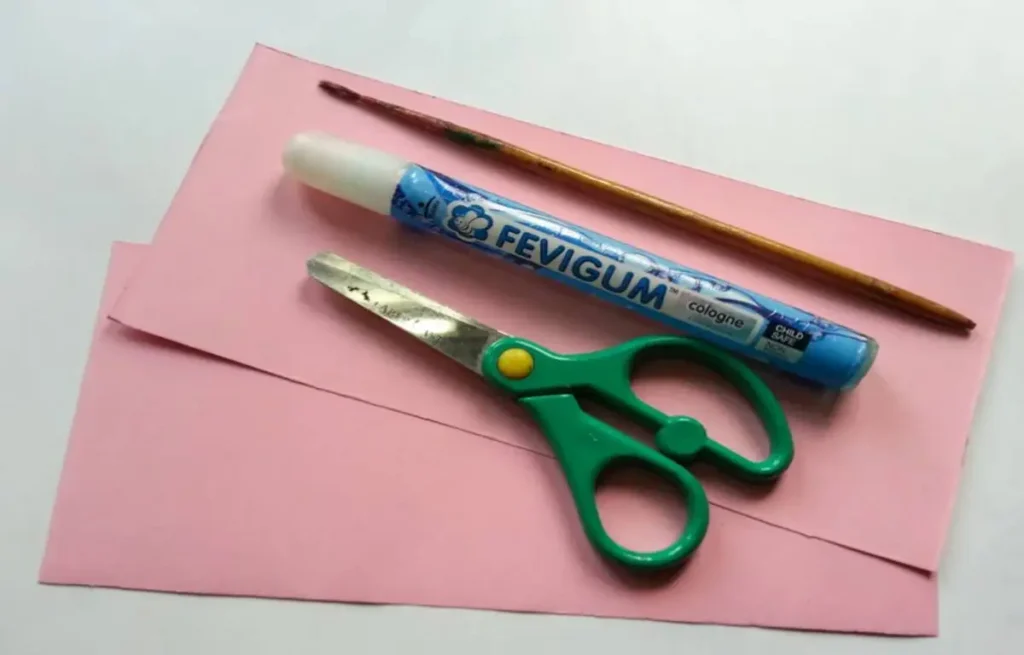
- Craft paper: Grab any color or texture that sparks joy—4″ by 4″ squares are my go-to. I once used some glittery paper, and it was almost too much, but so fun.
- Scissors: Get small, sharp ones for those fiddly cuts. Big clunky ones? Nope, they’ll mess up your petals, trust me.
- Glue: Craft glue or a glue stick does the job fine. I tried hot glue once, and it was a total disaster—paper everywhere, ugh.
- Something round: A paintbrush handle, pen, anything to curl your petals. I used a pencil last night, and it gave them such a nice, flowery vibe.
Paper Flowers Folding Tricks 1: The 6-Petal Blossom
This simple flower has a classic rounded look and layers beautifully for a full bloom.
Step-by-Step:
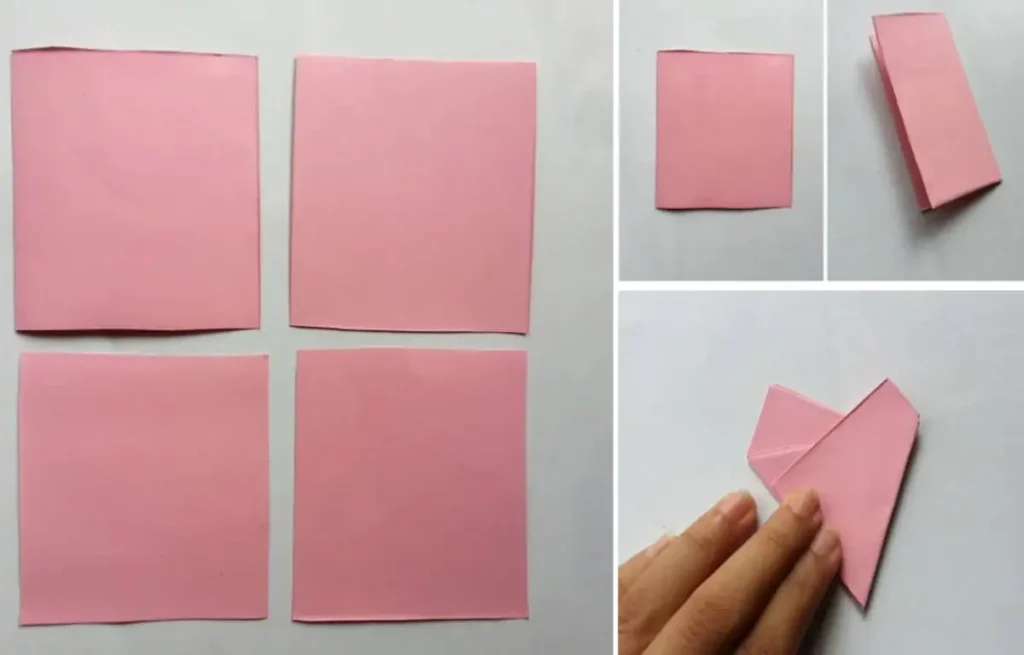
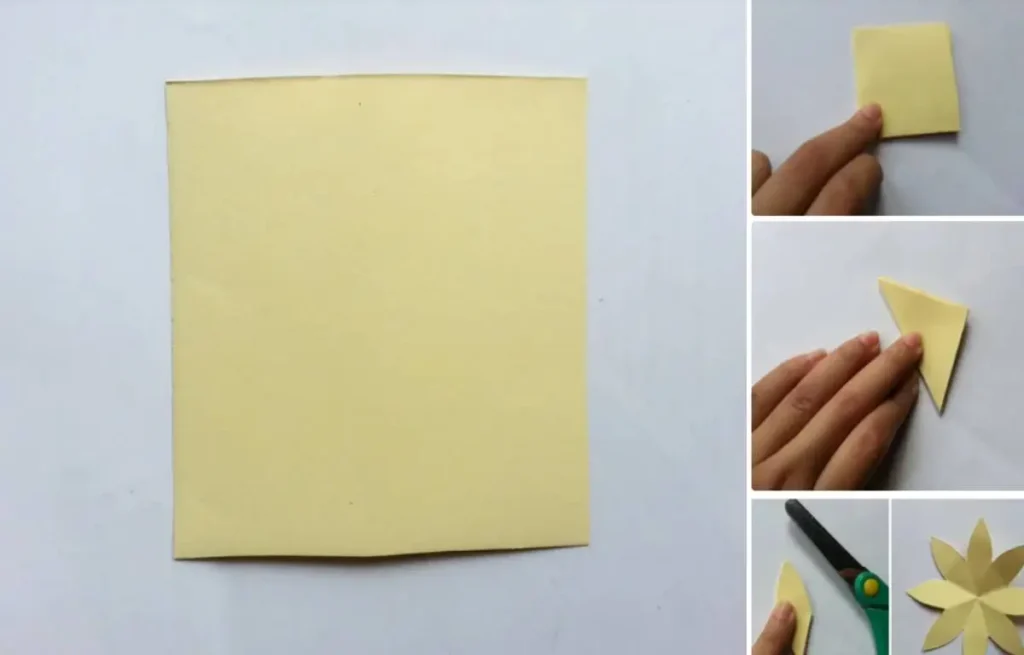
- Cut squares: Snip 4 equal 4×4-inch squares of craft paper. Stick with the same paper for a uniform look. I mixed colors once, and it was chaos.
- Fold into wedges: Fold each square into a triangle, then into thirds for a tiny wedge. Sounds fiddly, but it’s how you get even petals.
- Shape the petals: Cut an arch at the wedge’s top for round petal edges. Go gentle—my first try was too choppy and looked weird.
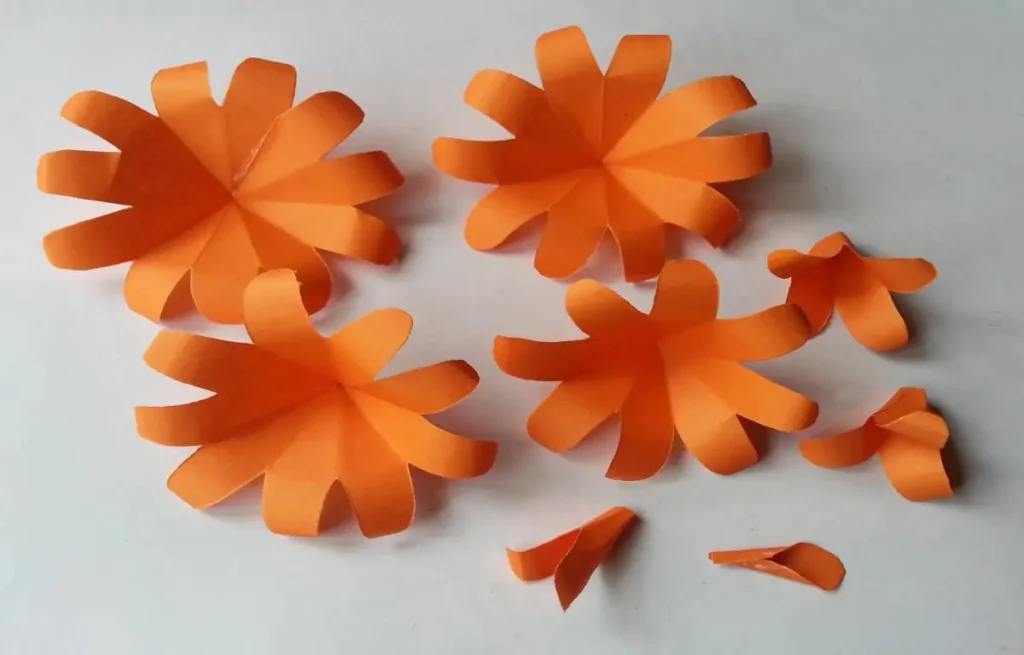
- Unfold flowers: Open each piece to reveal a 6-petal flower shape. Repeat for all 4 squares. Takes a sec, but it’s satisfying.
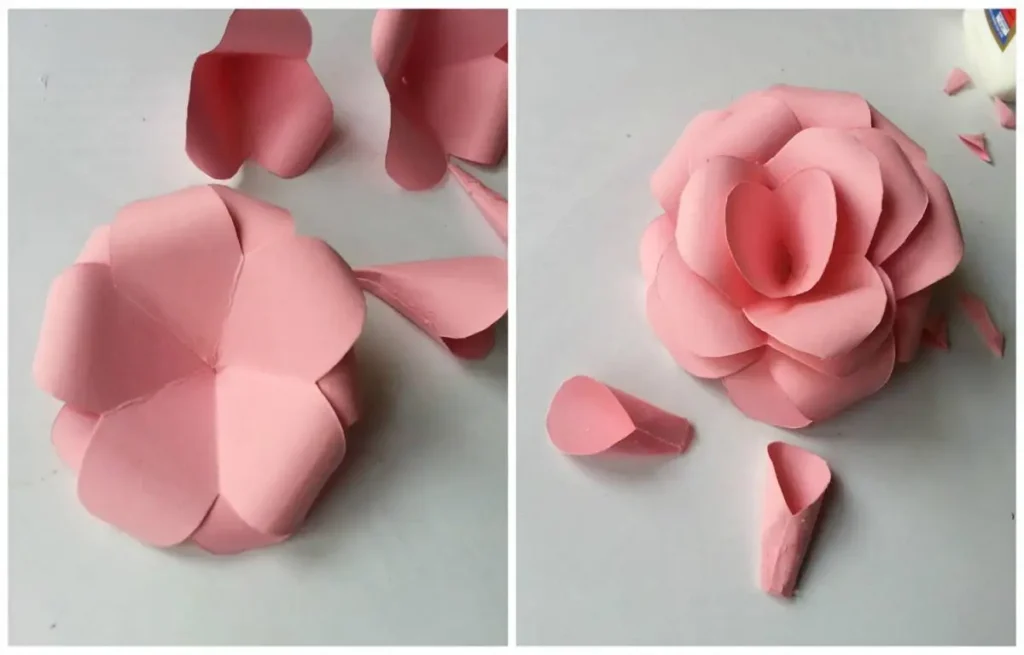
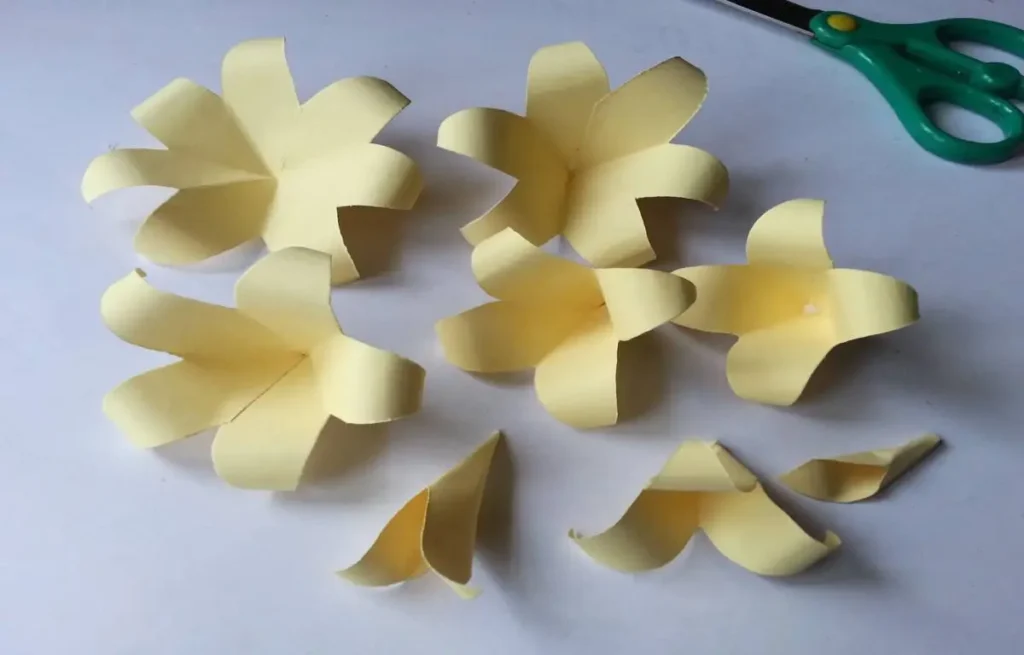
- Trim layers: Keep one piece whole (6 petals), trim another to 5, then 4, down to a single petal. I messed up the order once, oops.
- Curl petals: Use a pencil or something round to curl petal edges back. Gives ‘em that flowery pop. My niece loves this part.
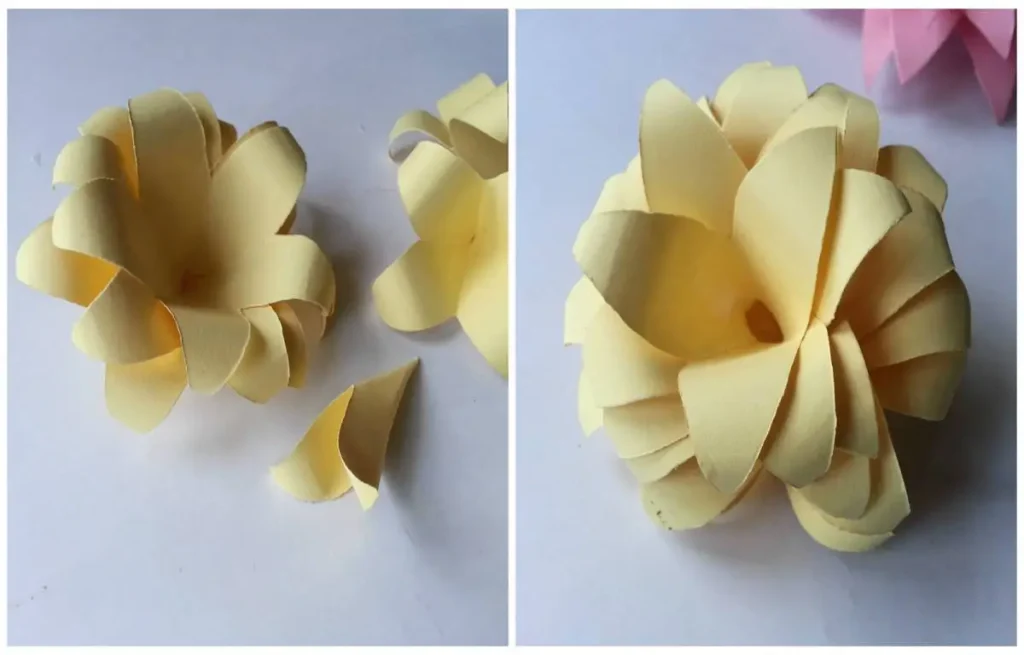
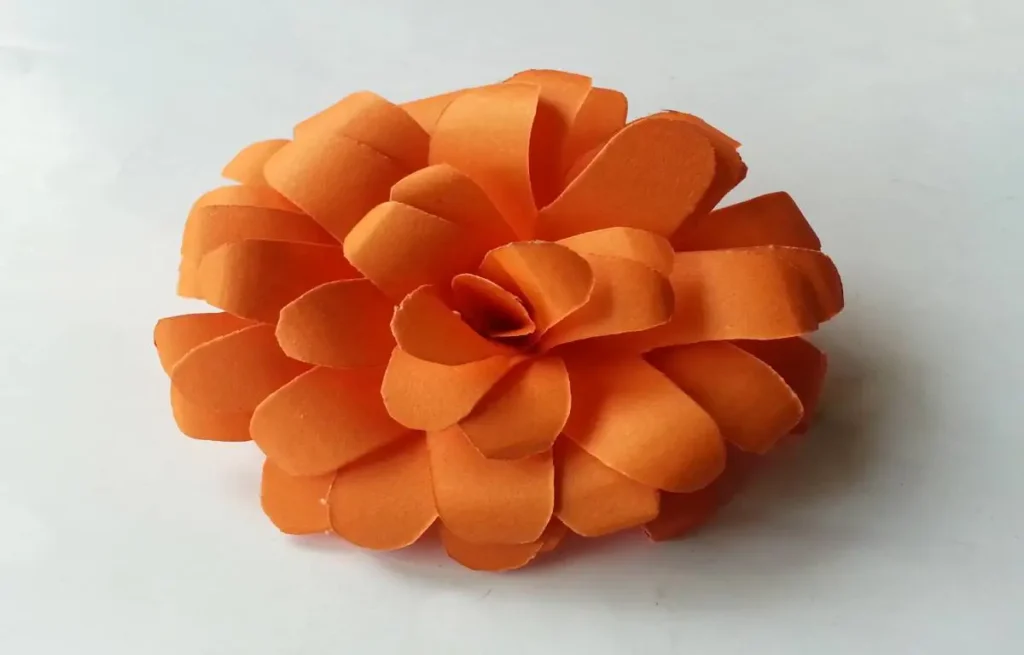
- Glue into cups: Dab glue on each piece’s inner edge and overlap slightly for a cup shape. Do this for every layer, no rushing.
- Stack ‘em up: Glue layers from biggest to smallest, lining up petals for a full bloom. Mine was lumpy at first, but it still looked cute.
Paper Flowers Folding Tricks 2: The 8-Petal Starburst
This flower style’s all about sharp, pointy petals that scream drama and make your creations pop. I tried these for a gift topper last week, and they stole the show—way fancier than my usual crafts. The layered effect gives them this bold, in-your-face vibe that’s perfect for jazzing up floral arrangements or just showing off. My first one was a bit uneven, but honestly, it still looked pretty epic.
Step-by-Step:
- Cut squares: Snip 4 paper squares, about 4×4 inches. I tried bigger ones once, and it was way too much flower for my tiny table.
- Fold into wedges: Fold each square in half three times ‘til you’ve got a skinny wedge, like an eighth of the paper. Sounds tricky, but it’s not.
- Shape petals: Cut a sharp triangle at the open edge for pointy petals. My first cut was super uneven—still worked, though!
- Unfold flowers: Open each piece to see an 8-petal shape. Do all 4. It’s kinda cool watching ‘em take shape.
- Trim layers: Keep one with 7 petals, trim another to 6, down to a single petal. I mixed up the order once, total chaos.
- Curl petals: Use a pencil or brush handle to curl petals from base to tip for some flair. My niece went wild curling hers.
- Glue loops: Dab glue on petal ends to close them slightly into loops. Takes patience—I smudged glue everywhere first try.
- Stack layers: Glue from biggest to smallest layer, offsetting petals for a natural vibe. Mine looked a bit wonky but still pretty.
- Add a center: Cut a yellow paper strip, fringe one side, roll it tight, and glue it in the middle for a stamen. Boom, your flower’s alive!
Paper Flowers Folding Tricks 3: The 12-Petal Peony
This flower style is all big and bold, stuffed with details that make everyone do a double-take. I made one last night, and it’s like a paper bouquet exploded on my table—total showstopper. The secret’s simple: more folds mean more petals, giving you that rich, layered look that’s almost too pretty. Mine was a little lopsided, but honestly, it still wowed my friends.
Step-by-Step:
- Start with 4 equal squares of paper.
- Fold each square into a triangle, then fold into thirds—just like you did for the first flower.
- Cut a rounded arch at the tip. Thanks to the folds, when you open it up, you’ll get 12 petals.
- Unfold and get all 4 floral bases ready.
- Now, trim each piece step-by-step:
- One with 11 petals
- Then 10, 9, and 8 petals
- Then down to 4, 3, 2, and finally 1 petal
- Next, curl each petal to add volume—you can curl some more dramatically to give your flower some natural variation.
- Glue the edges of each layer to shape them into a slight cup.
- Stack your layers starting with the largest (12 petals) at the bottom and work up to the smallest (1 petal) on top. Align the petals as you go to create a full, blooming effect.
- Let the glue dry completely before moving your masterpiece around.
Paper Flowers Folding Tricks 4: The Sweet 4-Petal Mini

This one’s smaller and more delicate — perfect for wreaths or hair accessories.

Step-by-Step:
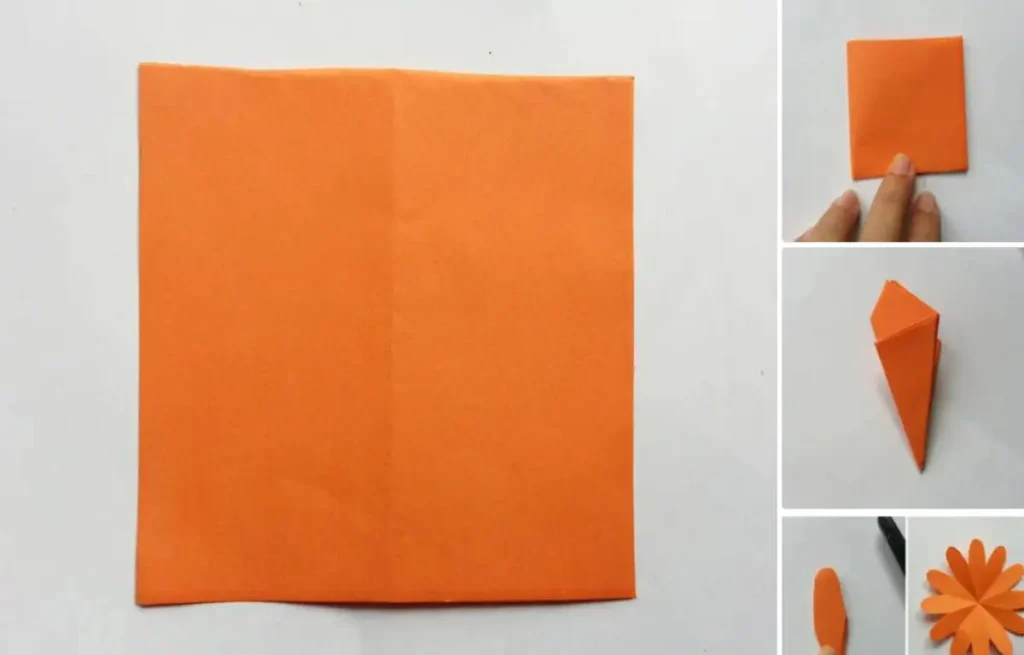
- Use 3 equal-sized squares of craft paper.
- Fold each square in half twice to form quarters.
- Cut an arch shape at the open edge — not too deep or sharp.
- Unfold to reveal 4-petal flowers.
- Trim pieces:
- Two with 3 petals
- Two with 2 petals
- Two with 1 petal
- Gently curl the petals as you did in previous flowers.
- Glue the sides together on each layer to give them dimension.
- Stack the petals, largest on the bottom, smallest on top.
- Create a yellow stamen by cutting a tiny fringed strip, rolling it, and gluing it in the center.
Conclusion
Once you’ve made a few, you’ll start to see just how flexible this technique can be. You can scale the flowers up or down, try out different color combinations, tweak the petal shapes—or even combine several styles in one arrangement. Whether you’re making a paper bouquet, a wreath, a festive centerpiece, or just dressing up a wrapped gift, there’s so much room to play.
And the best part? They look intricate and impressive, but once you get the rhythm of folding and layering, they come together faster than you’d think. It’s one of those crafts where the results feel way fancier than the effort it takes.
People Also Read:
Tissue Paper Flowers That Speak Love Silently
Painted Mason Jars You’ll Regret Not Making
FAQs
1. What materials do I need to make paper flowers?
You’ll need craft paper, scissors, glue, and a round object like a paintbrush to curl the petals.
2. How do I fold paper to create flower petals?
Fold the paper into halves and thirds, then cut the top into a petal shape. Unfold to reveal symmetrical petals.
3. Can I make different types of flowers using folding techniques?
Yes, by altering the folding and cutting methods, you can create various flower designs like roses, daisies, and more.
4. How can I add dimension to my paper flowers?
Use a small round object to curl the edges of the petals, giving them a more realistic, 3D appearance.
5. Are there tutorials available for making paper flowers?
Yes, there are numerous tutorials online, including step-by-step guides and videos, to help you master paper flower folding tricks.