
So, you’re thinking about adding some color to your home or garden? Painting terracotta pots is honestly one of the easiest ways to do it—and, if I’m being honest, way more fun than you’d think. It’s not a complicated project, doesn’t take much time, but somehow it can completely change how a space feels. Maybe you want to brighten up a quiet corner indoors, or maybe your garden outside could use a little character. Either way, I’ll walk you through the basics: simple steps, picking the right paint, and a few creative ideas to help your pots stand out—without making it a big deal.
1. Selecting the Best Paint for Your Terracotta Pots

You might not realize it, but choosing the right paint for your pots actually makes a bigger difference than just the color or finish. It’s about how long the paint sticks around without peeling or fading. Plus, where you put those pots really changes the game. A pot sitting quietly indoors won’t deal with the same wear and tear as one left outside, baking in the sun or getting soaked by rain. So, before you grab your brushes, it’s a good idea to think about what kind of paint will hold up best for your particular spot. Here’s a quick look at some tried-and-true paint options depending on where your pots will live.
Acrylic Paint: Versatile and Durable
Acrylic paint tends to be the go-to choice for terracotta pots, and honestly, it’s easy to see why. It dries quickly, comes in pretty much every color imaginable, and works well whether you’re brand new to DIY or have been crafting for years. You can go for a bold glossy look or stick with something more subtle and matte. Either way, it usually gives solid coverage and holds up surprisingly well, especially if you seal it properly afterward.
- Why Acrylic Paint?
- Acrylics are surprisingly tough. They work especially well for indoor pots since they dry fast and leave a nice clean finish that feels fresh without much effort. If you like a bolder look, you can easily layer the colors until it really pops — no fancy technique required.
- Quick tip: It’s worth choosing a good-quality acrylic paint. Cheaper ones might look fine at first, but the color tends to fade faster. Stores like Michaels or Joann usually carry paints made specifically for surfaces like terracotta or ceramic, which can make a noticeable difference over time.
Chalk Paint: For a Rustic, Weathered Aesthetic
If you’re aiming for something a little more rustic or vintage, chalk paint might be exactly what you need. It has this soft, matte finish that adds a bit of texture — not rough, just enough to give your pots some character. It fits right in with farmhouse styles or anything that leans shabby-chic. A lot of people use it for little decor touches around the house, and honestly, it’s hard to mess up. Even the imperfections kind of add to the charm.
Why Go with Chalk Paint?
One of the nice things about chalk paint is how it settles into the terracotta. Because the surface is already porous, the paint kind of soaks in and leaves behind a textured, slightly worn look — like it’s been around for a while in the best possible way. If you love that aged, lived-in style but don’t feel like sanding or layering for hours, this is a pretty simple shortcut.
A small heads-up: Chalk paint is more absorbent than acrylic, which means moisture can sneak in if you’re not careful. So, if your pots are going outside, don’t skip the sealer. It’ll save you from peeling or fading later on.
Waterproof Paint: A Must for Outdoor Use
If you’re working on pots that’ll live outside, waterproof paint really is a must. It adds that extra bit of protection your design needs to survive the weather — especially if your area gets sudden rain or intense sun. Without it, all that effort can fade fast or start peeling after just a few storms. It’s one of those things that might feel optional at first, but you’ll be glad you used it once the weather turns.
- Why Use Waterproof Paint?
- Outdoor pots go through a lot — sun, rain, and everything in between. That’s why waterproof paint makes such a difference. It’s designed to handle moisture and direct sunlight, which means your colors won’t start running or fading after just a few weeks outside. It keeps everything looking fresh a lot longer.
- Tip to keep in mind: Look for paints that are also UV-resistant. Not all waterproof options protect against sun damage, and without that added layer, even the boldest colors can start to dull way too soon.
2. Step-by-Step Process for Painting Terracotta Pots
After you’ve picked out your paint, the next step is getting your pots ready and actually painting them. Taking your time here really pays off — a careful, step-by-step approach can make all the difference if you want a smooth, long-lasting finish. It might seem a bit much at first, but trust me, it’s worth it.
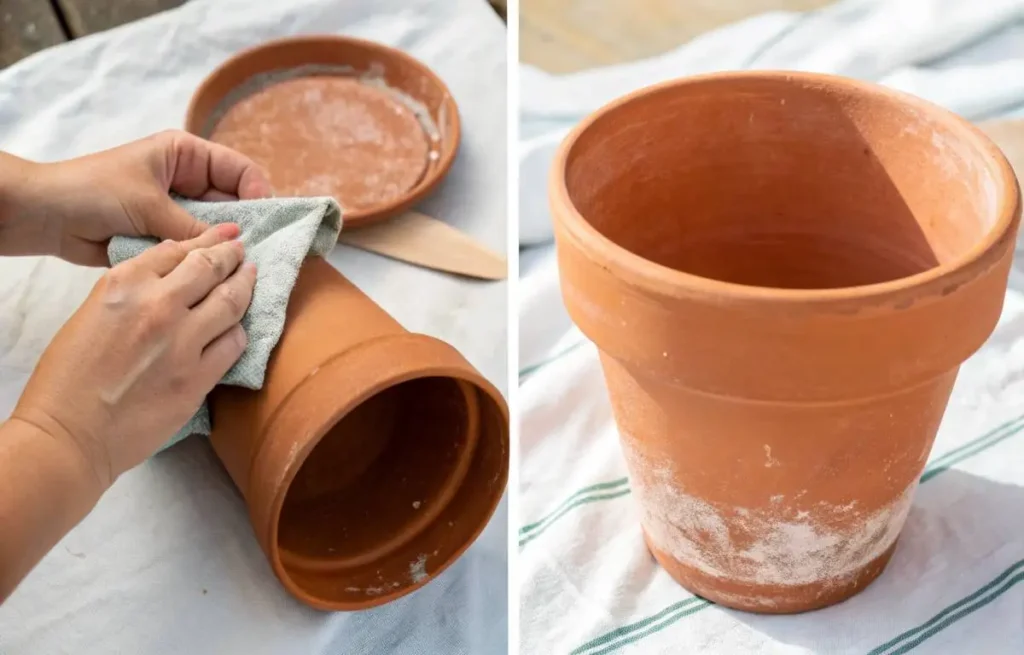
Preparing the Pot: Clean and Dry First
Before you start painting, it’s really important to prep your pot properly. Since terracotta is naturally porous, it tends to hold onto dust, dirt, or even leftover paint if it’s been used before. If you skip this step, those little bits can mess with how well your new paint sticks — and nobody wants that.
- Step 1: Start by wiping down the pot with a damp cloth or sponge to get rid of any dirt or dust. It doesn’t have to be perfect, just clean enough for the paint to stick.
- Step 2: If there’s old paint hanging around, a light sanding can really help smooth things out. You don’t need to go overboard—just enough to give the new paint something to grip onto.
- Step 3: Make sure the pot is completely dry before you paint. Even a bit of leftover moisture can cause the paint to peel sooner than you want.
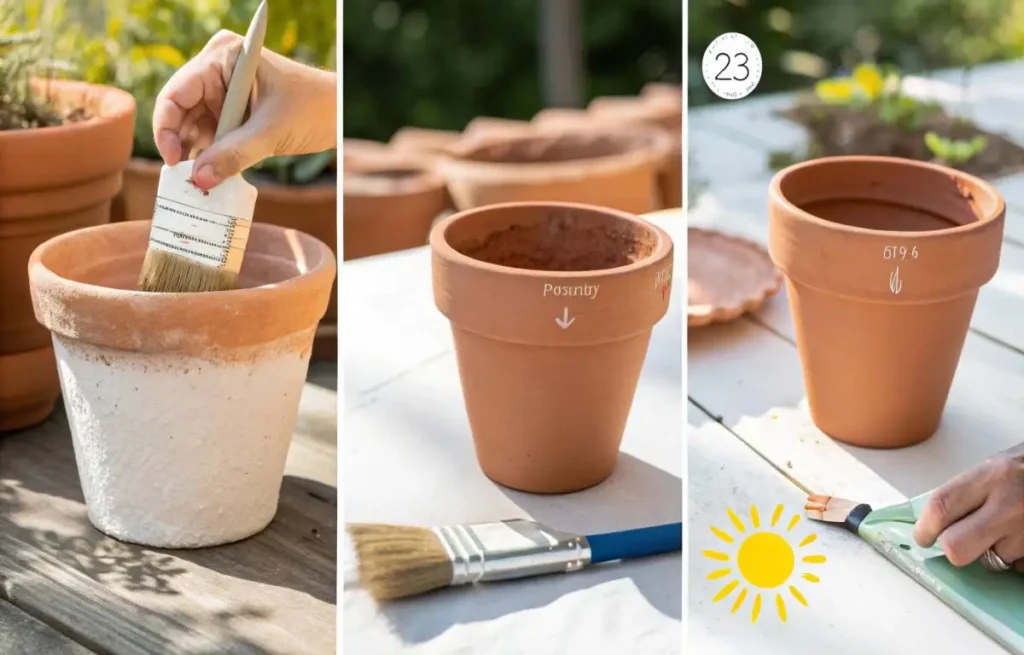
First Layer of Paint: Thin, Even Coats
Now that your pot is ready, it’s time for that first coat of paint. A lot of folks, especially if they’re new to this, tend to get a little heavy-handed here. But piling on too much paint at once usually just leads to streaks, bubbles, and an uneven finish, not exactly the look you want.
- Step 1: Grab a decent paintbrush or a foam brush and put on a thin, even layer. Don’t overload your brush—just dip it lightly and spread the paint nice and smooth.
- Step 2: Let that first coat dry completely. How long that takes depends on the paint you’re using and the humidity, but usually, it’s somewhere between 15 and 30 minutes.
And here’s a tip: if the paint looks streaky or patchy after it dries, don’t stress. Just give it a gentle sanding to smooth things out, then slap on a second coat for a nicer, more even finish.
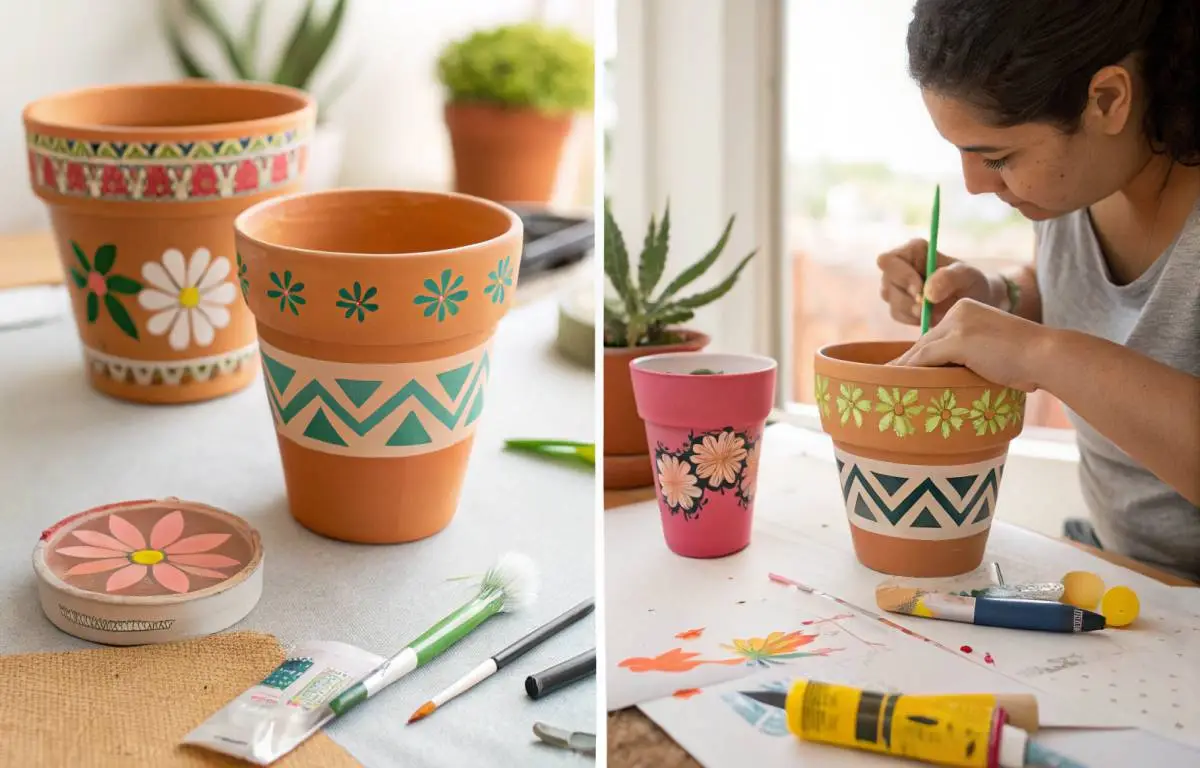
Adding Decorative Elements: Let Your Creativity Shine
Okay, so once your base coat’s dry, that’s when things start to get fun. This is where you really get to make the pot your own. Maybe you just want to keep it simple, like some stripes here and there. Or maybe you’re feeling a bit adventurous and want to try some geometric shapes. Flowers or delicate patterns? Sure, why not. And if you’re feeling fancy or nervous about freehand, you can always grab some stencils. Honestly, there’s no right or wrong way to do this. You can keep it super easy or go all out, whatever feels right.
If you’re just starting out, stencils can be a lifesaver. They help you add those little details, like flowers, mandalas, or cool shapes, without having to worry about messing up. Plus, they make your pots look way more professional, even if you’re not really into painting.
And if you want those crisp, clean lines, painter’s tape is your best friend. It’s perfect for blocking off areas or making straight stripes. It gives your pots that polished look that really makes them pop.
3. Sealing and Protecting Painted Terracotta Pots
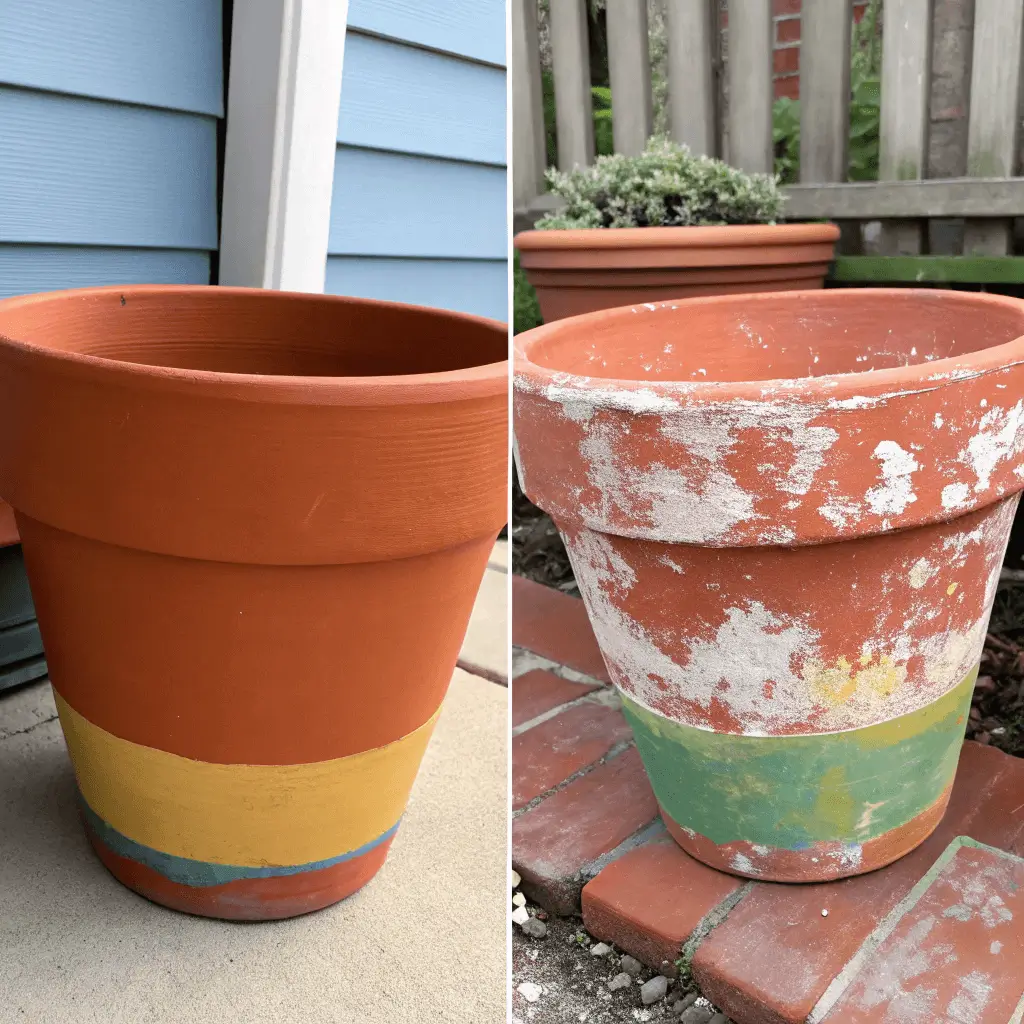
If you want your design to last and keep looking bright, sealing your painted pots is really important — especially if they’re going outside. The sealant works like a shield, protecting your hard work from fading, chipping, and moisture damage. Without it, all those colors might not stick around as long as you’d hope.
Why You Should Seal Your Painted Pots
If you skip adding a protective layer, the paint on your pots won’t last nearly as long. Moisture, dust, and sunlight all work against those colors, making them fade sooner than you’d like. And when heavy rain rolls in, it can even wash some of the paint right off. So, it’s really worth taking the extra step to seal them properly.
- Tip: Sealing does more than just protect your paint—it actually helps it stick better and keeps it from cracking over time. This step becomes even more important if your pots are going to spend time outdoors, facing whatever weather comes their way.
Choosing the Right Sealant
You’ll find plenty of sealants out there, but not all of them are a good fit for terracotta pots. It’s a good idea to pick one that matches the finish you want and the kind of environment your pots will be living in. That way, you get the best protection without any surprises.
- Spray-on Sealants: These work well if you have bigger pots or just want a fast, even coat. The finish tends to be smooth and uniform, though sometimes it’s a bit trickier to control where the spray goes.
- Brush-on Sealants: For smaller pots or when you want to be more precise, brush-on sealants are a solid choice. They let you carefully cover every spot and you can add extra layers if you want stronger protection.
Waterproof Sealants for Outdoor Use
If your pots are heading outdoors, it’s best to go with a waterproof sealant. This kind of sealant keeps rain from messing up your paint and helps the colors last much longer. Some even come with UV protection built in, which is great for stopping the sun from fading your hard work too quickly.
4. Creative Design Ideas for Painted Terracotta Pots
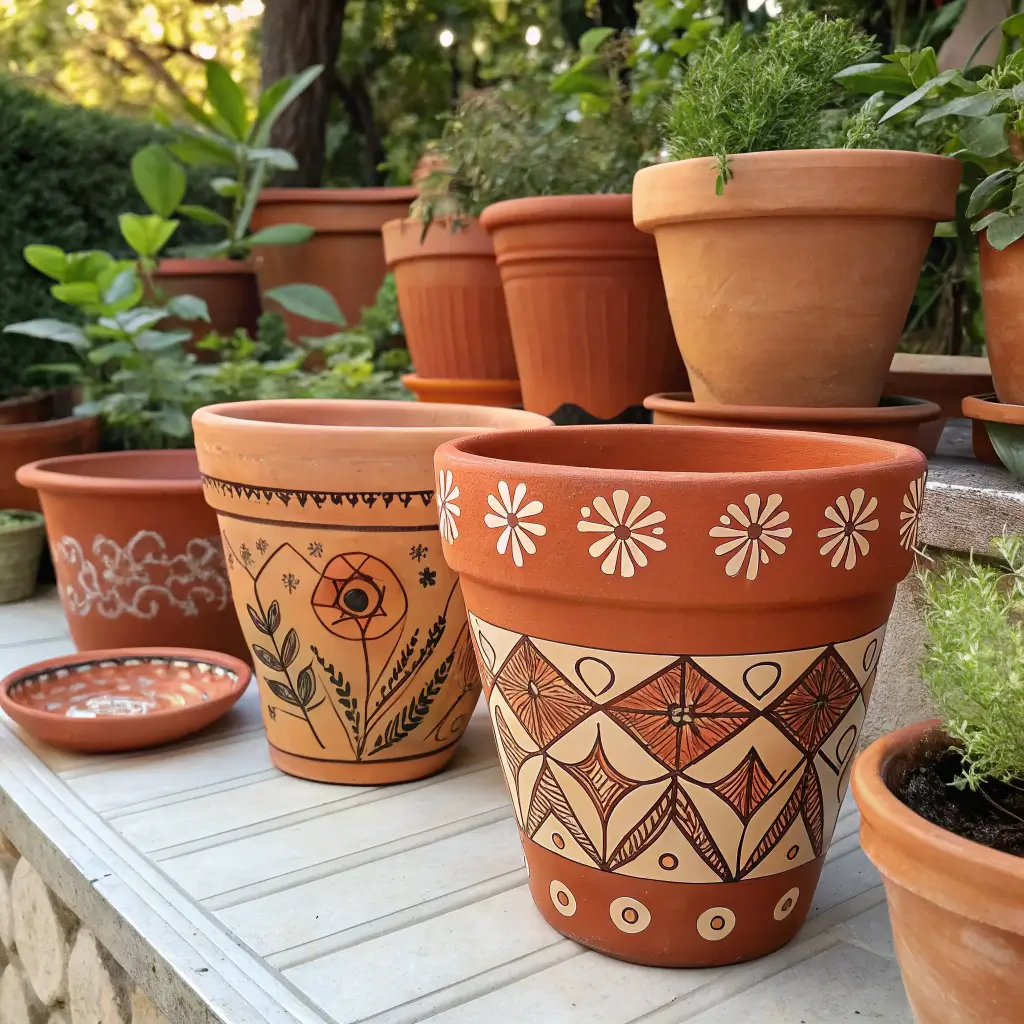
With your pots all painted and sealed, the fun part begins — making them truly your own. If you’re looking for some inspiration, here are a few creative ideas to get those artistic juices flowing.
Minimalist Designs: Simple, Yet Elegant
Sometimes, less really is more. A minimalist design can add a quiet elegance to just about any space. Think about using neutral colors like white, gray, or beige, and pairing them with simple patterns—maybe some geometric shapes or soft, subtle lines. It’s a look that feels clean and calm without trying too hard.
- Tip: Minimalist designs work well in modern or Scandinavian-style decor. Keep the design sleek and understated for a clean look.
Using Stencils for Intricate Details
Stencils are a great tool if you want to add detailed patterns without needing to be a painting pro. Whether it’s delicate flowers or bold abstract shapes, they make it easier to get those intricate designs looking sharp—without too much fuss.
- Tip: Choose stencils with contrasting colors to make the design pop. Bright colors like red, blue, or yellow work well for outdoor pots, while softer hues like pastels are better for indoor designs.
Ombre and Color Blocking: Bold and Modern
If you’re after something a bit more eye-catching, why not try an ombre or color-blocking technique? Ombre creates a smooth fade from one color to another, giving your pot a soft, blended look. On the other hand, color blocking uses bold, contrasting colors in separate sections to make a striking statement. Both can really turn a simple pot into something special.
- Tip: Ombre designs are ideal for pots that you want to stand out in your garden, while color blocking works well for modern, stylish indoor decor.
5. Common Mistakes to Avoid in Painting Terracotta Pots
If you want your painted terracotta pots to look really polished, it helps to avoid a few common mistakes. Here are some things to keep an eye on as you work.
Skipping the Sealing Step
Sealing your painted pots isn’t something to skip. Without a good sealant, the paint can start chipping, fading, or peeling sooner than you’d like. Using a high-quality sealant helps lock in the color and keeps your design looking fresh for longer.
Applying Too Much Paint
Applying thick layers of paint leads to streaks and uneven surfaces. Stick to thin, even coats, and allow each layer to dry fully before applying another.
Not Using Proper Tools
Having the right tools really changes the game. It’s worth investing in good brushes, quality stencils, and reliable paints if you want a smooth, polished finish. Using cheap or poor-quality supplies often leads to uneven coverage or streaky spots—and nobody wants that.
Conclusion
Painting terracotta pots is honestly one of those little projects that’s fun and pretty satisfying. It’s an easy way to mix things up and give your space—whether inside or outside—a fresh look. If you pick the right paint, do a bit of prep, and take your time, you can end up with designs that actually last for years. Maybe you like that worn-in, vintage kind of feel, or maybe you want something clean and simple, or even bold with bright blocks of color. Honestly, there’s no right or wrong—just whatever feels right to you.
FAQs
1. Can I use any type of paint on terracotta pots?
Yes, acrylic paint and chalk paint are ideal for terracotta pots, providing good coverage and durability.
2. Do I need to seal my painted terracotta pots?
Yes, sealing is important to protect the paint and ensure the pots last longer, especially for outdoor use.
3. How long should I wait for the paint to dry on terracotta pots?
Allow the paint to dry for at least 1-2 hours between coats, and 24 hours for the final layer to fully dry.
4. Can I paint terracotta pots for indoor use?
Absolutely! Painted terracotta pots look great indoors and add a pop of color to any space.
5. What’s the best way to clean terracotta pots before painting?
Clean the pots with water and a brush to remove dirt and debris, then let them dry completely before painting.
People Also Read
Terracotta Planters with Herbs That Bloom Magic
Your article is an eyeopener to those who think preparation of pots before painting is worthless to pay any attention. Even I see it more important than I had thought of.
Thank you, Rathna. Indeed it’s a key factor in the durability of the pots, and will even affect quality of the paint.