
Before we dive into the project, please note that this post contains affiliate links. If you click through and make a purchase, I may earn a small commission at absolutely no extra cost to you. As an Amazon Associate, I earn from qualifying purchases to keep this blog alive and pay some bills.
Turning ordinary cans into eye-catching home decor is one of those feel-good projects that’s both creative and practical. It’s amazing how something as simple as a used tin can—often tossed without a second thought—can become a charming, functional piece with just a little imagination.
Whether you’re repurposing cans for storage, turning them into planters, or crafting decor that truly stands out, this guide will walk you through the process step by step. These DIYs are not only budget-friendly, they also help cut down on waste and bring a personal, handmade touch to your space. Let’s dive in and give those cans a brand new purpose!
Creative Ways to Upcycle Cans into Beautiful Home Decor
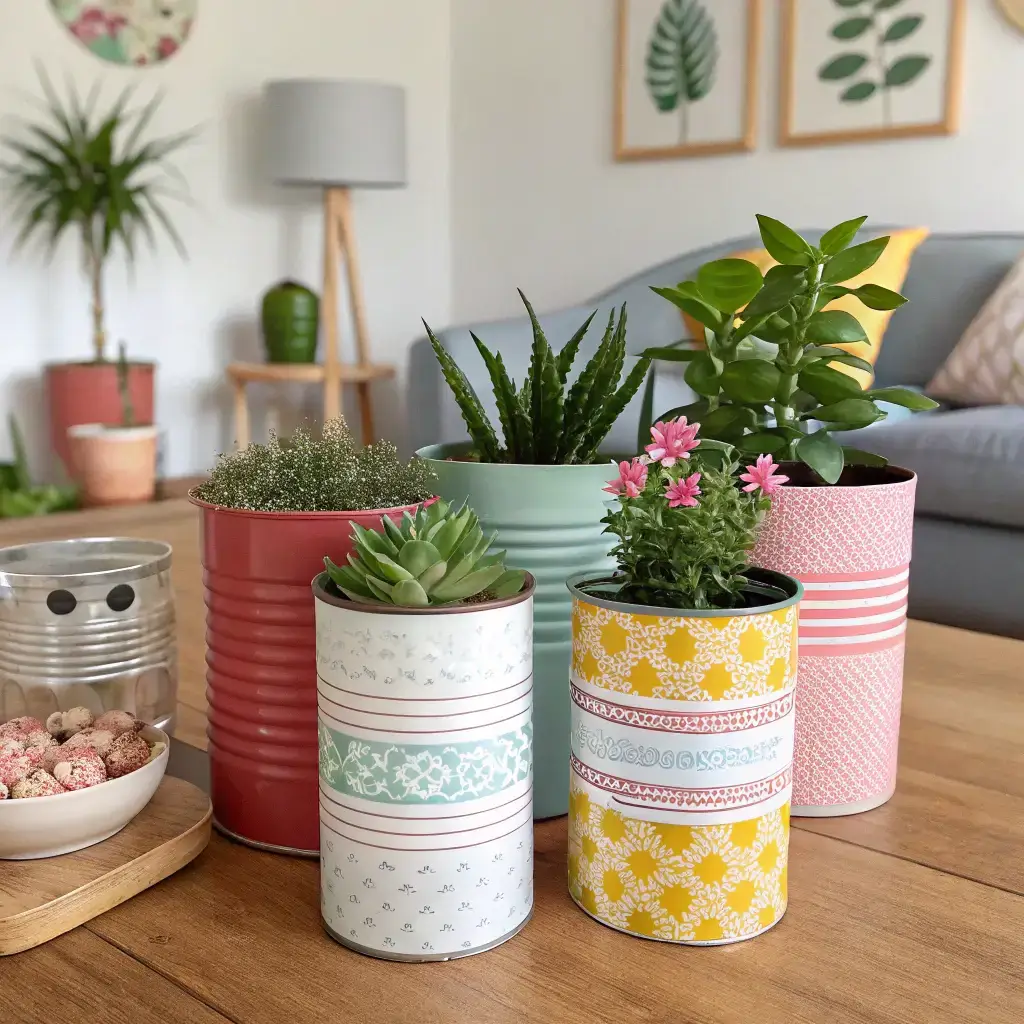
One of the easiest—and most popular—ways to upcycle cans is by turning them into unique home decor pieces. Whether you’re sprucing up a cozy corner in your living room, adding charm to a bedroom shelf, or bringing some personality to your garden, these simple projects can make a big impact.
With just a few basic materials and a little creativity, an ordinary can becomes something beautiful and useful. Think candle holders, rustic vases, lanterns, or even wall organizers. The possibilities are wide open—and surprisingly stylish.
Upcycle Cans: Turning Them into Gorgeous Planters
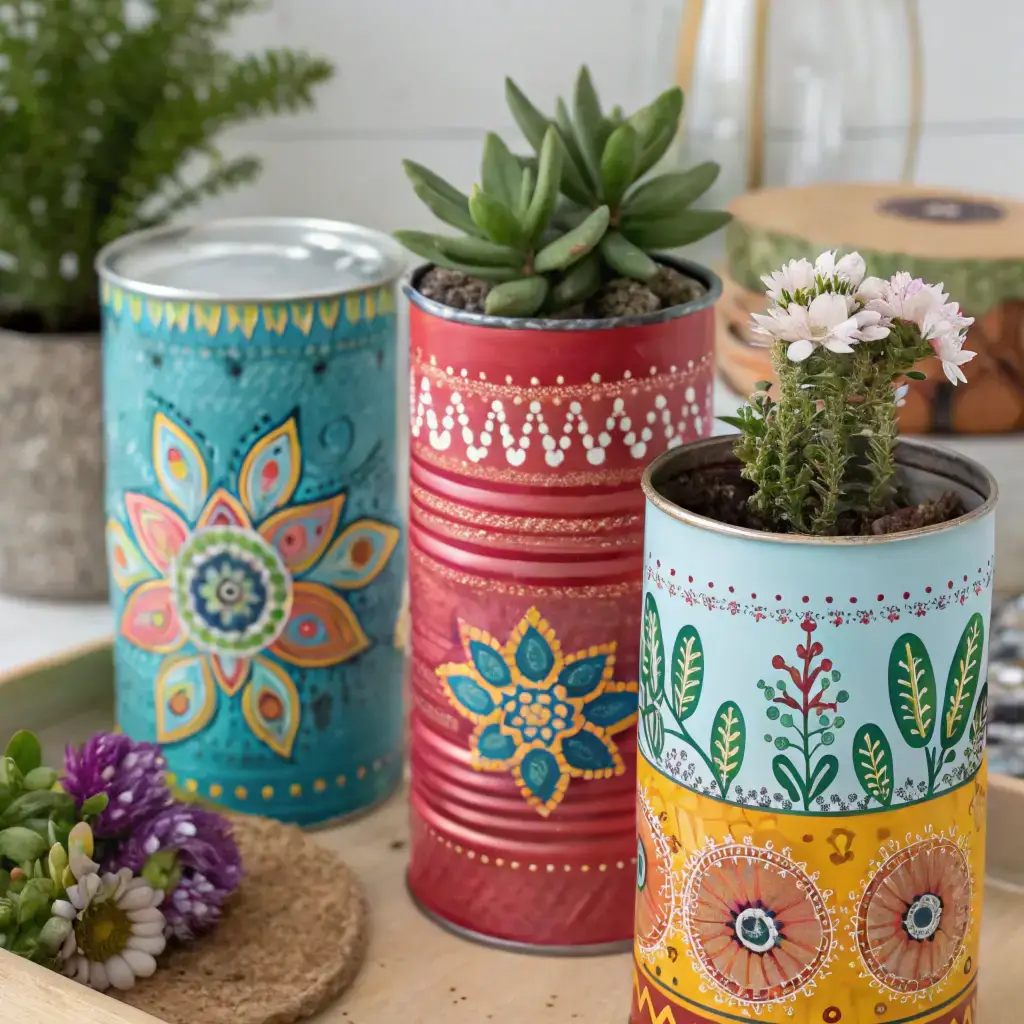
Turning cans into planters is a lovely way to bring a bit of green into your home without spending much—or anything at all. Whether you prefer a rustic, boho feel or something more modern and minimal, upcycled can planters are super versatile and easy to personalize.
They’re also a smart way to recycle what you already have, giving new life to something that might’ve ended up in the bin. Add a coat of paint, wrap with twine, or leave the metal exposed for an industrial look—whatever suits your style. Plus, they’re perfect for small herbs, succulents, or even little flower arrangements.
Materials needed:
- Old tin cans (different sizes)
- Paint (optional for decoration)
- Soil and plants (succulents, herbs, flowers)
- 🛒 SHOP HERE
Step-by-step:
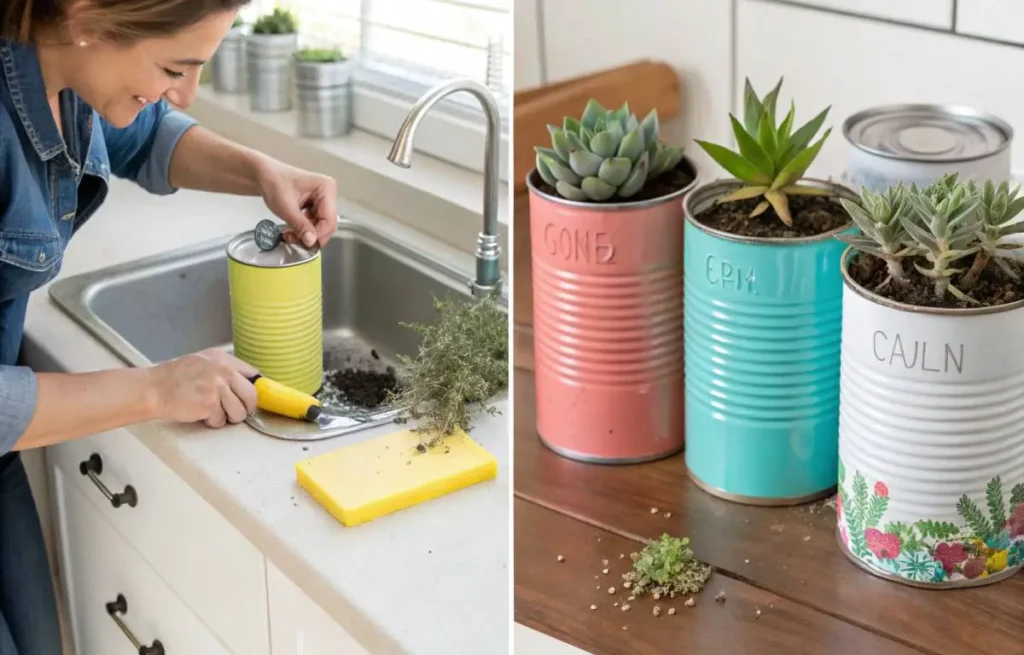
- I always start by giving the cans a good, thorough cleaning—removing any leftover food, glue, or labels. I like starting with a clean slate so the final look feels fresh and polished.
- If I’m aiming for a specific style, I’ll paint the cans next. Sometimes I go for soft neutrals and a rustic finish, other times I use bold colors or textured spray paint for something more playful or modern. It really depends on where I plan to use them.
- Then, I carefully drill a few small drainage holes in the bottom of each can. This part’s important, especially if you’re planting real greenery. I try to space the holes evenly so excess water can drain properly.
- After that, it’s just about filling the cans with soil and adding the plants. I usually stick with low-maintenance ones like succulents, herbs, or little flowering plants. They bring such a lovely touch of green to shelves, windowsills, or patios—and the best part is, each one feels a little different and entirely your own.
These upcycled can planters are perfect for window sills, desks, or any space that could use a touch of nature.
How to Upcycle Cans into Decorative Candle Holders
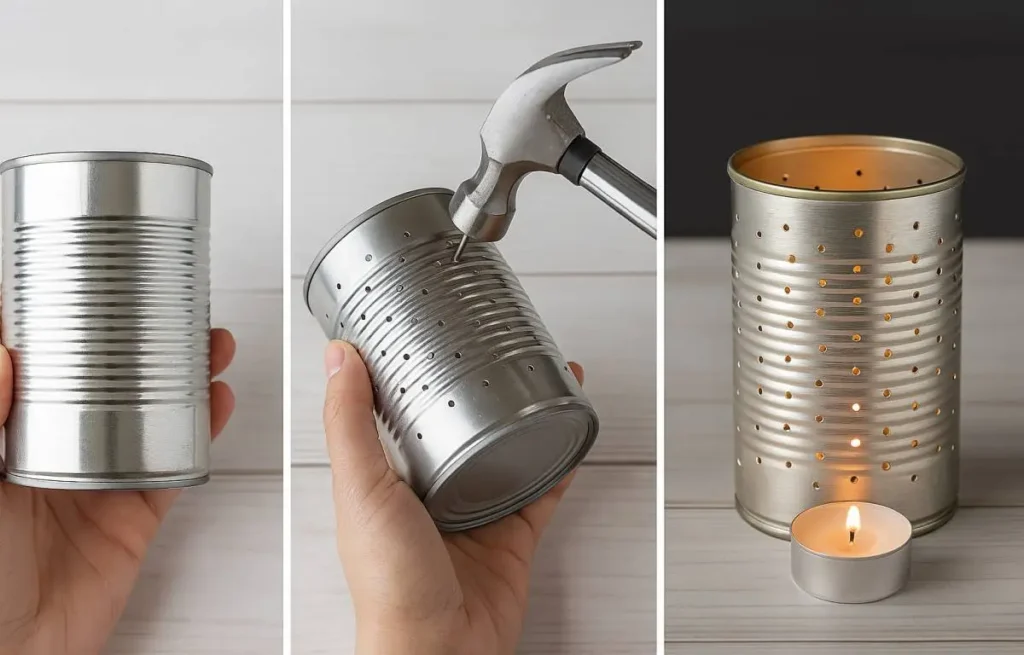
Candle holders are another charming way to breathe new life into empty cans. They’re simple to make, but the impact they bring—soft light, warmth, and a touch of handmade charm—feels anything but ordinary.
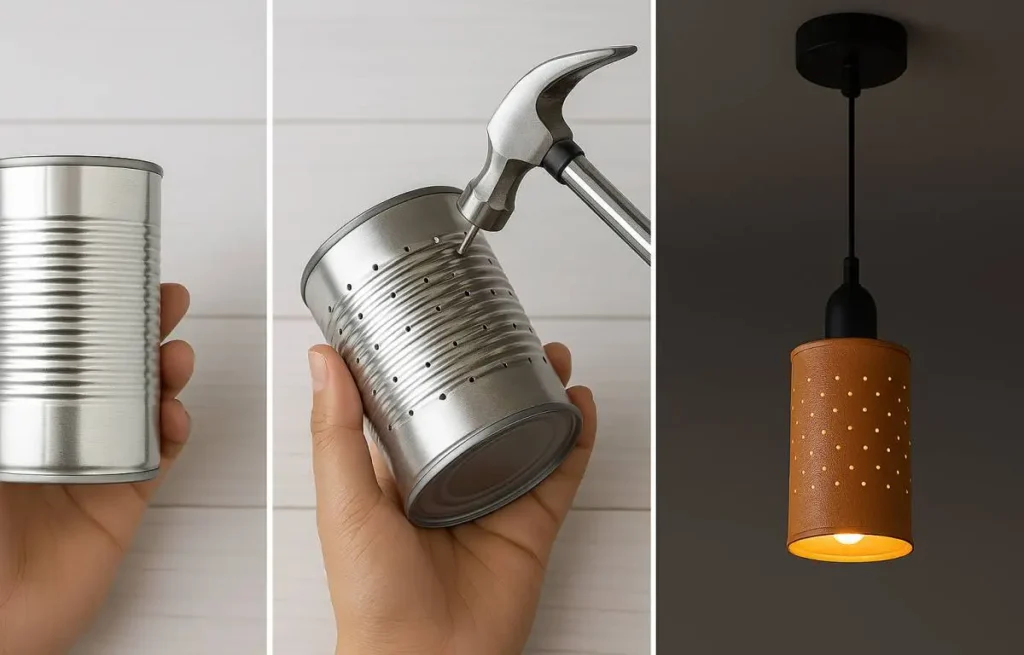
You can leave the metal exposed for an industrial vibe, paint them to match your decor, or even punch small patterns into the sides for a lantern-like glow. Whether you’re going for cozy and rustic or sleek and modern, there’s plenty of room to make them your own. And the best part? They fit just about anywhere—from a coffee table centerpiece to a quiet reading nook.
Materials needed:
- Empty cans
- Drill or hammer and nail
- Tea light candles or small candles
- 🛒 SHOP HERE
Step-by-step:
- First, I make sure to remove all the labels and give the can a good scrub—nothing fancy, just clean enough to start fresh.
- Then comes the fun part: punching the design. I’ll either use a drill or a hammer and nail to create small holes around the can. Sometimes I go with a simple pattern—like dots or stars—but other times I’ll sketch out something a little more detailed. It’s surprisingly relaxing, and the end result always feels personal.
- Once the pattern is in place, I pop in a tea light or small candle. When it’s lit, the light filters through those tiny holes and creates the prettiest glow. It’s such a simple project, but it instantly makes a space feel warm and welcoming.
These can be grouped together as a centerpiece or scattered around the home for a soft, inviting glow.
How to Upcycle Cans into Striking Wall Art
Tin cans aren’t just for storage or planters—they can also be transformed into eye-catching wall art that adds a truly unique touch to your home. Whether you lean toward clean, minimalist designs or something more bold and eclectic, upcycled cans offer a surprisingly versatile canvas for creativity.
Plus, making your own wall art lets you put a personal stamp on your space in a way that ready-made pieces just can’t match. It’s a fun project that turns everyday objects into conversation starters.
Materials needed:
- Several tin cans
- Paint, fabric, or decorative paper
- Glue or nails
- 🛒 SHOP HERE
Step-by-step:

- First things first, I give the cans a good clean—no dust or grime allowed, since a fresh surface makes all the difference.
- Then comes the fun part: decorating. I might paint them, wrap them in fabric, or cover them with decorative paper—depending on the vibe I’m going for. Sometimes it’s clean and minimalist, other times more colorful and eclectic.
- Once they’re ready, I arrange the cans on the wall, playing around with different patterns or shapes until something feels just right. I use nails or strong adhesive to secure them in place. The end result? A one-of-a-kind, eco-friendly piece of wall art that really brings character and personality to my home.
This is a great way to create custom, eco-friendly artwork that reflects your personal style.
Upcycle Cans for Budget-Friendly Home Decor Ideas
You know, upcycling cans is one of those things that just makes sense. It’s good for the planet and won’t mess with your budget. Instead of chucking those empty cans, you can turn them into something cool and unique that really adds character to your space—without spending a ton. Plus, it’s a fun way to get creative and actually do a bit of good for the environment. It’s a small step, but it kinda adds up, both at home and beyond.
Transforming Cans into Custom Lighting Fixtures
Now, lighting fixtures? That’s a clever way to breathe new life into old cans. Whether you’re making pendant lights or chandeliers, those upcycled cans bring a cool industrial or rustic vibe to any room. And honestly, these DIY lights don’t just brighten things up—they add a handmade touch you just can’t find in the store.
Materials needed:
- Tin cans
- Light bulbs and wiring
- Paint (optional)
- 🛒 SHOP HERE
Step-by-step:
1. Washing the Cans
Soak them overnight because I’ll forget about them until tomorrow. Peel the labels off halfway, get annoyed, then attack them with steel wool until the can looks like it lost a fight.
2. Drilling Holes
Use the right drill bit this time (unlike last time). Clamp the can down because I value my fingers. My “perfectly spaced” holes always end up with one weirdo hole that’s slightly off – that’s the “artistic statement” hole.
3. Wiring
Follow the instructions. Get confused. Watch a YouTube video halfway through. Cross my fingers when I plug it in. Still not dead yet, so I call that a win.
4. Painting
Spray paint outside like a normal person, not in the garage like I did that one time. The fumes made the neighbors worry. Two light coats are better than one globby coat (learned that after three failed attempts).
5. Hanging
Measure twice, still hang it crooked. Adjust. Adjust again. Leave it slightly crooked and tell people it’s “organic asymmetry.”
Pro Tips From My Failures:
Wear gloves unless you like metal cuts
Don’t drill after drinking coffee
Test the light before you hang it up all nice
If it looks bad, add more holes and call it “modern design”
Upcycled Cans for Stylish Storage Solutions
You know, old cans can actually turn into some pretty stylish and handy storage containers. Whether you’re trying to get your office, kitchen, or bathroom a bit more organized, upcycled cans do the trick while adding a little charm to the mix. And the best part? It won’t cost you extra. You’re basically turning trash into something useful and even kinda nice to look at.
Materials needed:
- Empty cans
- Hot glue gun
- Decorative materials (e.g., fabric, rope, or paint)
Step-by-step:
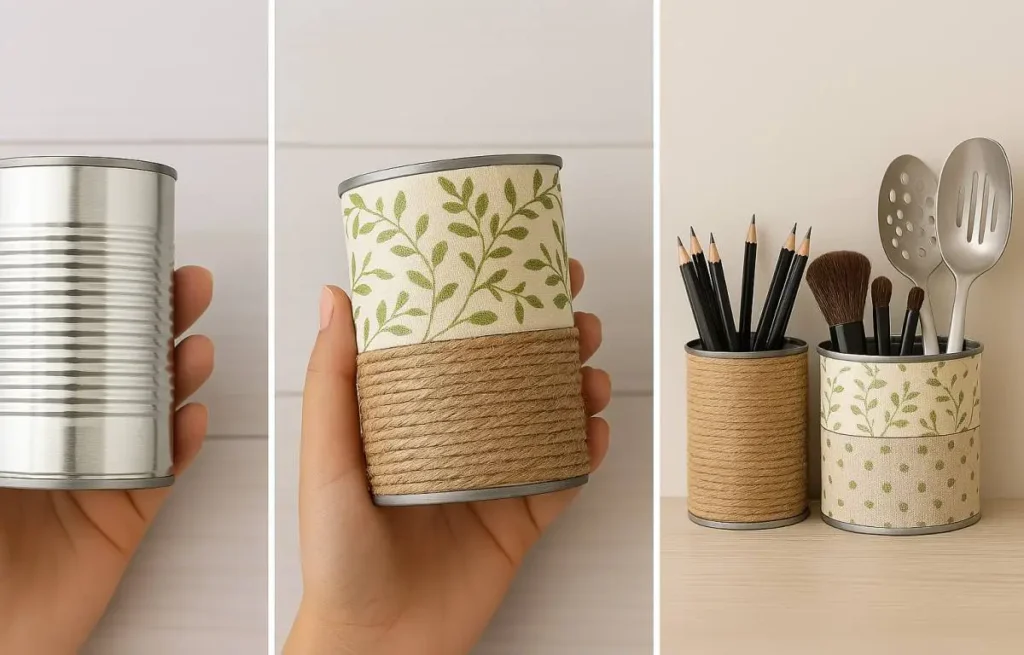
- I start by cleaning the cans thoroughly and peeling off any labels—I want them looking neat and ready for decorating.
- Next, I get creative with how I dress them up. Sometimes I wrap them in fabric or rope, other times I paint them to match the room’s vibe. It’s a great chance to add a personal touch and tie everything together.
- Once they’re decorated, I put the cans to work as storage containers—pens, makeup brushes, kitchen utensils, you name it. Not only do they keep things organized, but they also bring a little extra charm and personality to the space.
These upcycled storage containers are both functional and stylish.
Upcycle Cans into Beautiful Centerpieces for Your Table
Who knew empty cans could look this good? With a little creativity, those humble tins can turn into gorgeous centerpieces that steal the show at your next dinner. Seriously—just some paint, ribbon, or even a handful of wildflowers can make them look like they belong in a fancy magazine spread.
I love how versatile they are, too. Going for a rustic summer vibe? Wrap them in twine and stuff in some sunflowers. More of a cozy autumn person? Try cinnamon sticks and dried oranges. (Though, full disclosure, my first attempt looked more “kindergarten craft” than “Pinterest-perfect.” Practice helps!)
The best part? They’re basically free if you upcycle soup or coffee cans. Just scrub off the labels, and boom—instant charm. Sometimes the simplest ideas end up being the prettiest.
Materials needed:
- Empty cans
- Paint or decorative paper
- Flowers, candles, or beads
Step-by-step:
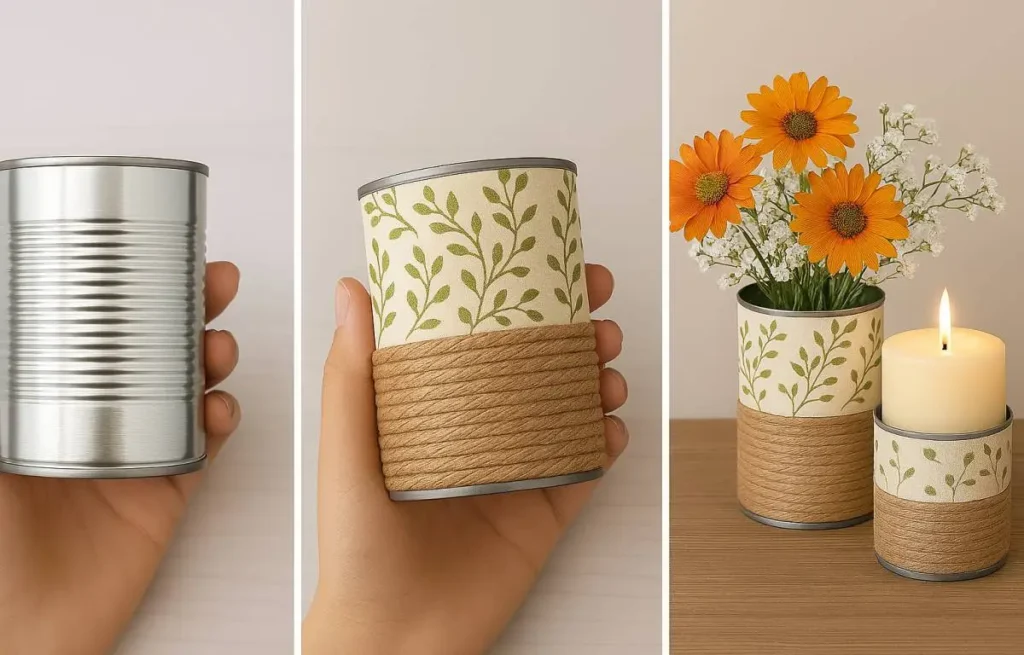
- I start by giving those cans a good scrub, making sure every bit of gunk and old label is history. Then comes the fun part—jazzing them up. Sometimes I just slap on a quick coat of paint, maybe a soft blue or a sunny yellow, depending on what’s speaking to me. Other times, I’ll wrap them in some patterned paper I’ve got lying around, like something floral for spring or sparkly for the holidays. I try to pick colors or designs that feel right for the season or whatever party I’m throwing, though I’ll admit my “fall vibes” can sometimes look more like “random orange explosion.”
- After that, I fill them up based on the mood I’m chasing. If I want something earthy, I’ll stuff them with fresh flowers—daisies or wildflowers are my go-to for that rustic charm. For a cozier, date-night kind of feel, I pop in a candle and let that warm glow do its thing. Or, if I’m feeling extra, I’ll toss in some beads or little trinkets for a bit of pizzazz. It really depends on what I’m hosting—a chill brunch or a big birthday bash—and honestly, sometimes I just wing it and see what looks good.
This simple project will add a personal touch to your dining area without breaking the bank.
Eco-Friendly Ideas: How to Upcycle Cans

How to Repurpose Cans as Greenery Holders
Turning old cans into planters is honestly such a clever way to spruce up your place without harming the planet. It feels good to give those tins a second life, you know? Plus, it’s like a little nod to keeping things green in your own neighborhood. Adding plants doesn’t just make your space look nicer—it’s like they bring a bit of calm with them. I’ve read they might even clean the air a touch, though I’m no expert on that. There’s something about having greenery around that just settles the mind, at least for me. And the best part? You don’t need to spend a fortune to make it happen. It’s all about working with what you’ve got, which always feels like a small win.
Materials needed:
- Old cans
- Soil
- Plants (succulents, ivy, etc.)
Step-by-step:
- So, first things first, I grab those old cans and give them a good scrub. I’m talking serious elbow grease to get every scrap of label and grime off. It’s kind of a pain, but I swear it’s weirdly therapeutic, like peeling off a sunburn (not that I’d recommend that).
- Next, I drop some small stones into the bottom of each can. It’s not just for looks—those pebbles let water drain so the plants don’t end up sitting in a swamp. I had a cactus drown once, which sounds impossible, but trust me, it happened, and I’m still a little embarrassed about it.
- Then comes the fun part: filling the cans with soil and tucking in some plants. I usually pick stuff like succulents or maybe some ivy because they’re tough enough to survive my occasional neglect. Honestly, having a bit of green around just makes the place feel alive, you know? It’s like the room breathes better, even if that’s just me being fanciful.
These upcycled cans are great for creating a natural, earthy vibe in your home.
Eco-Friendly Accessories from Upcycled Cans
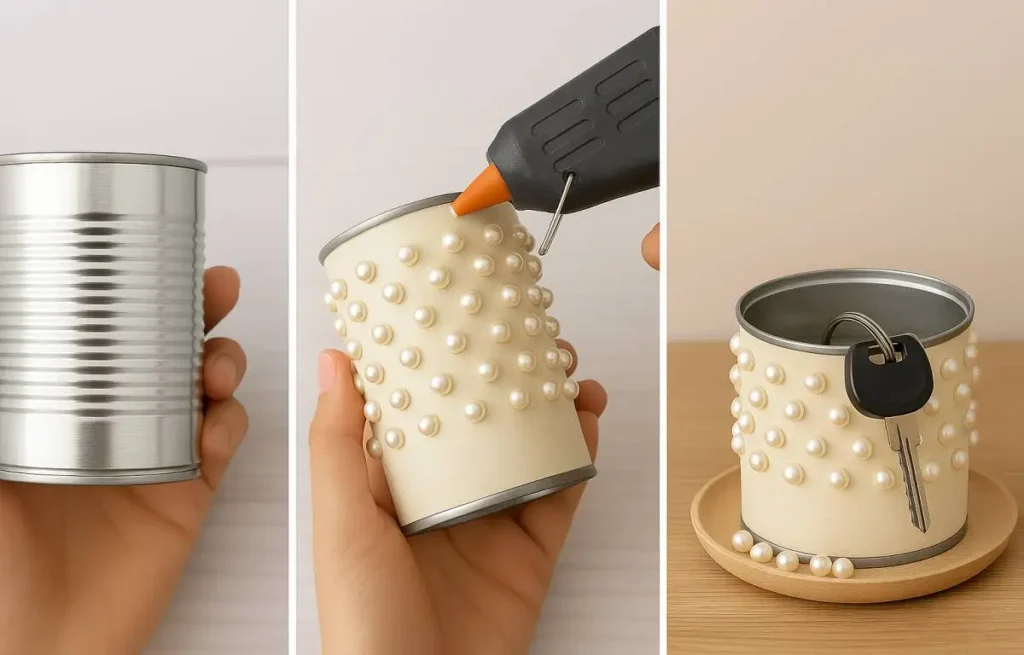
Tin cans can be transformed into a variety of sustainable home accessories like trays, coasters, or handy storage containers. These pieces not only help keep your space tidy but also reduce waste by giving new life to materials that might otherwise be discarded. Plus, you can customize them to fit your personal style—whether that’s sleek and modern, rustic and cozy, or bright and playful—making your home both organized and uniquely yours.
Materials needed:
- Tin cans
- Hot glue gun, paint, or fabric
- Decorative materials (e.g., beads, buttons)
Step-by-step:
1. Cleaning the Cans
Those labels never cooperate like they should. I’ve found soaking them in warm, soapy water for at least an hour makes a difference, though some brands still leave behind sticky patches. A little vegetable oil on a cloth helps remove the last bits of glue. It’s not the most exciting part, but starting with a clean surface makes everything else work better.
2. Handling the Edges
After cutting my fingers one too many times, I now always file down the rims thoroughly. A metal file or sandpaper works well – I spend about a minute per can going over all the edges until they’re smooth to the touch. Sometimes I’ll bend the edges inward slightly for extra safety.
3. The Painting Process
Spray painting looks easier than it is. My first attempts had drips and uneven spots because I was impatient. Now I do light coats from about 12 inches away, waiting 15 minutes between coats. Matte finishes tend to work better than glossy at hiding imperfections. And always painting outside is a must – the fumes are stronger than you’d expect.
4. Putting Them to Use
The ones holding pens on my desk have held up well, though they show wear where items rub against them daily. I tried using one in the bathroom, but the humidity caused the paint to bubble after a while. They’re not perfect, but each one feels like a small victory against waste.
What I’ve Learned:
• Patience with prep work pays off later
• Quality spray paint makes a noticeable difference
• Simple designs are more forgiving
• They develop character with use
• The satisfaction makes the effort worthwhile
These eco-friendly accessories can add both function and beauty to your space.
Essential Tools for How to Upcycle Cans
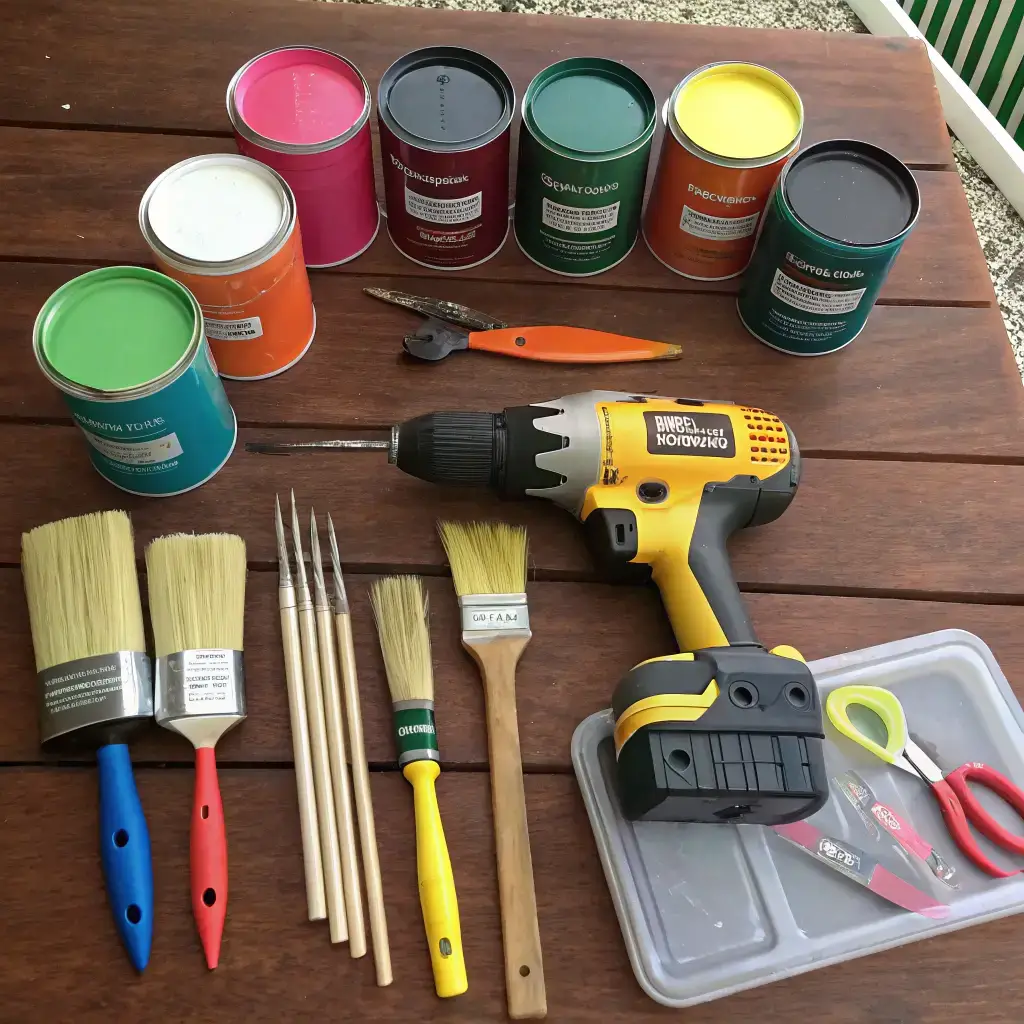
Using the right tools and techniques makes all the difference when upcycling cans into beautiful home decor. Here’s a handy guide to the essentials that’ll make your DIY projects easier and more enjoyable:
1. Can Opener (The Unsung Hero)
- Get one that actually works, not that dollar-store imposter that mangles lids into razor blades.
- Pro tip: Open from the side, not the top – leaves a smoother edge for crafting (and fewer ER visits).
2. Drill (AKA The “Hope You Like Loud Noises” Tool)
- Cordless is best unless you enjoy tripping over wires mid-project.
- Start with small bits (1/16″) unless you want accidental “ventilation holes” in your design.
- Personal fail: Drilled through my workbench once. The can was fine though.
3. Pliers (For When You Fight Back)
- Needle-nose pliers: Bend edges under for safety, or pretend you meant to make “abstract” jagged shapes.
- Reality check: Metal fights back. My “whimsical curl” ended up looking like a tin can sneer.
4. Sandpaper (The Boring Lifesaver)
- 120-grit for quick edge smoothing, 220-grit if you’re fancy.
- Skip this step and enjoy explaining your “artisanal bloodstain aesthetic.”
5. Hot Glue Gun (The Enabler)
- High-temp for fabrics/rope, low-temp if you value your fingerprints.
- Confession: 80% of my “upcycles” are just cans with stuff glued to them. It’s fine.
6. Paint (Where Good Intentions Go to Die)
- Acrylics: Chip if you breathe on them wrong. Seal with Mod Podge or tears.
- Spray paint: Do this outside unless you want your garage floor polka-dotted.
- Chalk paint: Looks “shabby chic” in tutorials, looks “my kid did this” in real life.
Bonus: The Tools Nobody Mentions
- Band-Aids (for when you ignore the sandpaper step)
- Pencil with eraser (to fix wet glue mistakes)
- Wine (for when your “easy project” becomes a 3-hour battle)
Having these tools on hand makes your upcycling not only safer but also more fun and professional-looking!
Techniques for How to Upcycle Cans into Stunning Home Decor
The key to upcycling cans successfully lies in mastering a few essential techniques. Whether it’s painting, cutting, or gluing, these methods can elevate your project. Additionally, understanding these techniques can help you achieve professional-level results.
Painting Cans for Added Color
Painting your cans is one of the easiest and most effective ways to give them a fresh new look. A coat of paint can instantly transform an old tin can into a beautiful, custom piece of decor that matches your style. Here’s how I approach painting cans:
1. Choosing Paint (Or How I Learned the Hard Way)
- Acrylics: Great for detail work, but if you don’t seal it, it’ll chip the second someone looks at it wrong. (My “perfectly painted” herb pots lasted one watering can encounter.)
- Spray paint: Fast and smooth if you don’t mind the neighbors judging your neon-pink-test-spray phase on the driveway.
- Chalk paint: Looks “shabby chic” when professionals do it. Looks “shabby shit” when I do it.
2. Prepping the Can (The Step I Always Want to Skip)
- Soak off labels, then spend 20 minutes picking at that one stubborn glue spot before giving up and calling it “texture.”
- Sanding helps paint stick… in theory. In reality, I usually forget until after the first coat peels.
3. Priming (Optional, Unlike My Regret)
- Primer does help… if you remember to use it. My “rustic” unprimed cans achieved authentic rust faster than expected.
4. Painting (Where Hope Meets Reality)
- Spray paint pro tip: Shake the can longer than you think. That one splattery patch will haunt you forever.
- Brush painting: Thin coats are key. I, however, am impatient and end up with drip marks I later call “artistic.”
- Drying time: The 2 hours the can says = 4 hours in real life. Touch it early and leave a fingerprint forever.
5. Sealing (If You Actually Want It to Last)
- Matte sealant for chalk paint, glossy for acrylics. Or skip it like I did and watch your masterpiece slowly degrade like my will to craft.
Bonus: My “Signature” Mistakes
- Forgetting which side I painted, leaving a perfect handprint
- Spray painting in slightly windy conditions (now my fence is speckled)
- Using “quick dry” paint that wasn’t quick, wasn’t dry, and wasn’t my friend
Painting your cans is one of the simplest and most rewarding ways to breathe new life into them. Just a fresh coat of paint can turn an ordinary tin can into a beautiful, personalized decor piece that fits your style perfectly. Here’s how I usually go about painting my cans:
Creating Intricate Designs by Cutting Patterns
Cutting intricate patterns into your cans is a fantastic way to turn simple upcycled items into eye-catching, one-of-a-kind decor pieces. This technique lets you play with light and shadow, adding a beautiful, dynamic touch to your space. Here’s how I usually approach it:
1. Washing the Cans
Soak them overnight because I’ll forget about them until tomorrow. Peel the labels off halfway, get annoyed, then attack them with steel wool until the can looks like it lost a fight.
2. Drilling Holes
Use the right drill bit this time (unlike last time). Clamp the can down because I value my fingers. My “perfectly spaced” holes always end up with one weirdo hole that’s slightly off – that’s the “artistic statement” hole.
3. Wiring
Follow the instructions. Get confused. Watch a YouTube video halfway through. Cross my fingers when I plug it in. Still not dead yet, so I call that a win.
4. Painting
Spray paint outside like a normal person, not in the garage like I did that one time. The fumes made the neighbors worry. Two light coats are better than one globby coat (learned that after three failed attempts).
5. Hanging
Measure twice, still hang it crooked. Adjust. Adjust again. Leave it slightly crooked and tell people it’s “organic asymmetry.”
Pro Tips From My Failures:
- Wear gloves unless you like metal cuts
- Don’t drill after drinking coffee
- Test the light before you hang it up all nice
- If it looks bad, add more holes and call it “modern design”
Using Hot Glue for Attaching Embellishments
Whether I’m attaching fabric, rope, beads, or other decorative touches, a hot glue gun is my go-to for a neat, secure finish. Here’s how I use it:
Okay, let’s turn that sad soup can into something that doesn’t scream ‘college dorm’ – here’s how I do it (badly, but with enthusiasm):
First, raid your junk drawer like a raccoon on espresso. Fabric scraps? Twine from that abandoned macramé phase? Buttons from the shirt you ruined last summer? Perfect. I usually go for the “organized chaos” look – meaning I start with a plan and immediately abandon it.
Hot glue gun time – aka the adult version of finger painting. Pro tip: Plug it in before you need it, unlike me last Tuesday. Work in small sections because that “low heat” setting lies. Glue one inch, swear when you burn yourself, stick on your decoration, repeat. Fabric people: do a test spot first unless you want your floral print to look like it melted in the microwave.
When attaching stuff, press like you mean it – we’re not making a museum piece here. My first rope-wrapped can unraveled in public like my last relationship. Now I gorilla-glue that sucker and hold it for a full “Mississippi-1-Mississippi-2” count.
Want next-level texture? Throw everything at it. That lace from 2012? Glue it. Broken jewelry? Glue it. That weird seashell from the beach trip? Glue it. I call this the “more is more” method. My masterpiece has three buttons hanging by a thread – we call that ~~~abstract~~~.
Final step: Walk away before you ruin it. I give it 10 minutes to dry – or until I get distracted by snacks. Come back, trim the wonky bits, and boom. It’s not perfect, but it’s got soul (and possibly some of your fingerprints in the glue).
With these techniques, your upcycled cans can become stunning decor pieces.
Conclusion
Okay, confession time – my first upcycled can project looked like a kindergartener’s art class reject. The paint globbed, the burlap unraveled… but somewhere between that disaster and today’s decent-looking herb pots, I got hooked.
There’s something satisfying about forcing a soup can to become something beautiful. It’s not just about being eco-friendly (though that’s nice), but about proving things can change. Even if your creation ends up a little wonky – mine usually are – that’s part of the charm. The dents tell stories.
Pro tip? Sand the edges unless you want battle scars. Learned that the hard way.
FAQs
1. How do I start upcycling cans for home decor?
Begin by collecting cans, cleaning them thoroughly, and deciding on a design. Use paints, adhesives, and other craft supplies to transform them into unique decor pieces.
2. What tools do I need to upcycle cans?
You’ll need basic tools like scissors, glue, paint, a drill, and optional items like stencils or fabric for added decoration.
3. Can I use upcycled cans as planters?
Yes! Simply drill holes in the bottom for drainage, add soil, and plant your favorite flowers or herbs.
4. How can I make my upcycled cans look more decorative?
Paint them in bold colors, add fabric or washi tape, or use stencils for fun designs to enhance their aesthetic appeal.
5. Are upcycled cans eco-friendly? by giving old cans a new purpose, contributing to a more sustainable lifestyle.
People Also Read